
Okay, hear me out: this might just be the best thing I’ve ever made. I mean it. Think classic s’mores—but frozen into this insanely layered ice cream cake that somehow feels nostalgic and fancy at the same time. I made this for a pool party and people lost their minds. Jay went back for seconds (and thirds), and my brother told me it was in his “Top 3 Desserts Ever.” High praise.
It looks intense, but I pinky promise: it’s easy. It’s more about layering and freezing than anything else. The only real cooking you do is melting chocolate and whipping up a marshmallow cream that you get to torch. I’m obsessed. Plus, I found the cutest six-inch cake barrier things to line my springform pan (IYKYK), and they made this whole thing even more foolproof.

Ingredients:
-
Graham Crackers
These are the base of the crust and bring that familiar s’mores flavor right in from the start. I blend mine into a fine flour-like crumb so it holds together well with butter. You want it smooth, not chunky. It creates the perfect sturdy, sandy layer to build on. -
Unsalted Butter
Butter is key to binding the graham crust together, and later it helps make the fudge glossy and rich. I always use unsalted so I can control the salt levels myself. Melt it so it mixes in easily. -
Semi-Sweet Chocolate Chips
These get melted into a thick, dreamy fudge layer. I go for semi-sweet because they strike the right balance between rich and not-too-sweet. You could use dark chocolate chips too if that’s your vibe. -
Sweetened Condensed Milk
This is how you cheat your way to fudge without needing heavy cream or sugar. It makes everything thick, sweet, and shiny. One can is all you need. -
Vanilla Extract
Adds that warm, aromatic note that balances out the sweetness in both the fudge and the marshmallow cream. Trust me, don’t skip it—it rounds everything out.
-
Vanilla Ice Cream
I used Tillamook because it’s super creamy and scoops easily once softened. This goes right over the fudge layer and plays perfectly with the rich chocolate. You want a nice contrast! -
Chocolate Ice Cream
This gets smoothed on top as the final frozen layer. It’s rich and dramatic, and it just screams summer dessert. It also helps hold all the layers in. -
Egg Whites
These whip up into a beautiful marshmallow fluff. Make sure there’s no yolk in them or they won’t whip right. They give the topping structure and that gorgeous, toasted finish. -
Granulated Sugar
You’ll dissolve this into the egg whites to create the base for the marshmallow topping. It stabilizes everything and makes it sweet (but not too sweet). -
Cream of Tartar
This helps stabilize the whipped egg whites so they hold their peaks and get fluffy. A small amount goes a long way!
💕 Why You’ll Love This Recipe
-
It’s show-stopping but simple. Looks fancy, but mostly freezing time.
-
Perfect for summer parties, BBQs, or birthdays.
-
That toasted marshmallow topping is everything.
-
Makes a big batch—serves 20+, so everyone gets a slice.
-
You get all the classic s’mores flavors in every bite.
Equipment You’ll Need:
- 9 inch spring form pan – This is essential for easy layering and removal—don’t skip it or you’ll struggle to get clean slices.
- Blender or food processor – Used to crush the graham crackers into a super fine, flour-like consistency for the crust.
- Mixing bowls – You’ll need a couple—one for the crust, one for the fudge, and another for the marshmallow cream.
- Medium saucepan – Perfect for gently melting down the fudge ingredients without burning the chocolate.
- Rubber spatula – Helps with smooth spreading of the fudge and ice cream layers—plus it’s great for scraping every last bit.
- Stand mixer or hand mixer – You’ll need this to whip the egg whites into fluffy, glossy marshmallow cream.
- Double boiler (or a heatproof bowl over a saucepan) – This gently heats the egg whites and sugar without scrambling them—crucial for the marshmallow topping.
- Kitchen torch – To get that iconic toasted marshmallow finish—this is what makes it feel like a real s’more.
- Plastic cake collar (optional but helpful) – Makes the sides of your cake look super smooth and helps release it easily from the pan.
- Parchment paper – Line the base of the springform pan so the crust doesn’t stick and slices lift out cleanly.
- Ice cream scoop or large spoon – Scoop and dollop the ice cream layers easily—especially when it’s soft and melty.
Substitutions & Modifications
-
No chocolate chips? Sub chopped chocolate bars instead.
-
Dairy-free? Use vegan butter and your favorite plant-based ice creams.
-
Gluten-free? Swap in gluten-free graham crackers.
-
No cream of tartar? Use 1 tsp lemon juice instead.
-
Want it smaller? Halve the ingredients and use a 6″ or 7″ pan.
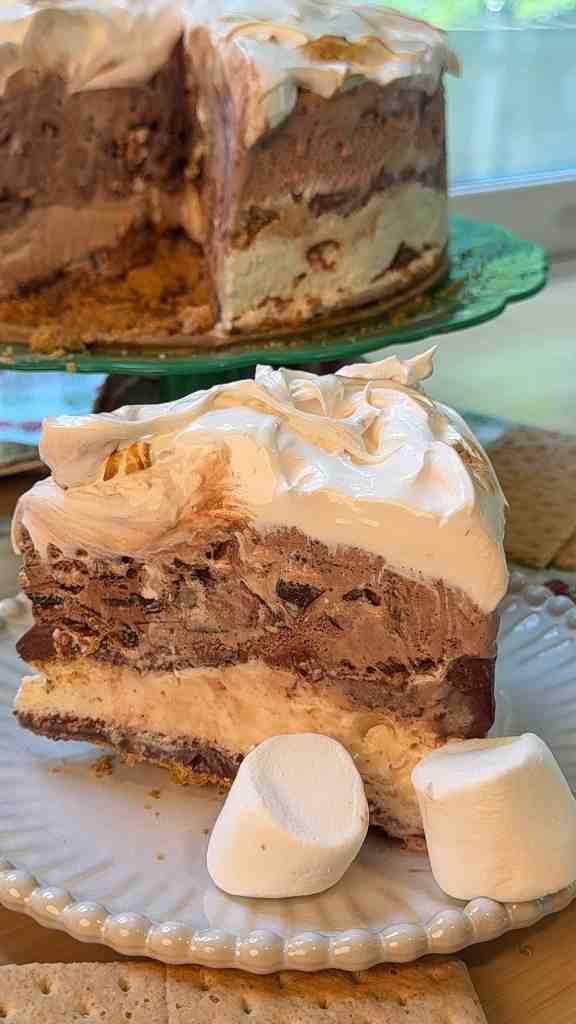

Smores Ice Cream Cake – The Ultimate Frozen Summer Dessert
Video
Ingredients
- 2 cups finely crushed graham crackers
- ⅓ cup + 2 tbsp unsalted butter, melted
- 1 cup semi-sweet chocolate chips
- 14 oz sweetened condensed milk
- 2 tsp vanilla extract divided
- 48 oz vanilla ice cream
- 48 oz chocolate ice cream
- 4 egg whites
- 1 cup granulated sugar
- ½ tsp cream tartar
Instructions
- Make the crust:Blend graham crackers into a fine, flour-like crumb. Reserve 1/3 in a small bowl. Mix remaining 2/3 with melted butter. Press into a greased/lined 9″ springform pan. Bake at 350°F for 15 minutes. Let cool.
- Make the fudge:In a saucepan over low-medium heat, stir sweetened condensed milk and chocolate chips until melted and smooth. Remove from heat, stir in butter until melted, then add vanilla.
- Layer time:Pour half the fudge over the cooled crust. Freeze 10 minutes.
- Add vanilla ice cream:Spread all the vanilla ice cream evenly. Freeze again until slightly firm, about 10 minutes.
- Add remaining crumbs and fudge:Sprinkle reserved graham crumbs, then drizzle the remaining fudge. Freeze 5 minutes.
- Add chocolate ice cream:Smooth it out across the top. Freeze 4 hours to overnight. Overnight is best!
- Make marshmallow topping:In a double boiler, whisk egg whites and sugar until sugar is fully dissolved (rub between fingers to check). Transfer to a stand mixer, add cream of tartar and vanilla, and beat on high for 8–10 minutes until thick and fluffy.
- Top and torch:Spread marshmallow cream on top. Freeze for 5 minutes. Use a kitchen torch to toast the top. Slice and serve!
Nutrition
Tips & Tricks
-
Line your springform pan with a plastic cake collar or parchment on the sides—it makes clean slices so easy.
-
Let your ice cream sit out for 10–15 minutes to soften for easy layering.
-
Use a warm offset spatula to smooth the ice cream layers.
-
When torching the top, keep the flame moving to avoid burning.
-
Make it the day before so it freezes completely overnight.
Storage Instructions
- Store covered in the freezer for up to 7 days.
-
After torching, you can refreeze the leftovers—but it’s best enjoyed the same day for the toasted top.
-
If making ahead, wait to torch until right before serving.
More of my recipes
Do you LOVE Smores?! Check Out More of my Favs:Next-Level Brown Butter Smores Brownies with Homemade Marshmallow Frosting Browned Butter Smores Chocolate Chip Cookies Recipe (With VIDEO) Toasted Marshmallow Latte (Hot or Iced!) – Tastes Like a Campfire in a Cup
Conclusion
This s’mores ice cream cake is everything summer desserts should be: cold, sweet, nostalgic, and over-the-top in the best way. It’s totally a “wow” moment, but it’s also 100% doable. Bring it to your next BBQ, birthday bash, or pool hang and watch it disappear.
If you make this, tag me on Instagram @munchiesbymallory—I LOVE seeing your creations! Want more summery sweets? Head to the blog for all my frozen favorites and sign up for the newsletter so you never miss a recipe drop. 💌🍦




Leave a Reply