Ingredients:
Graham Crackers: The graham crackers are the base of our crust, adding that classic, sweet, and slightly nutty crunch that pairs so perfectly with cheesecake. Since they’re dry and crumbly, they’re easy to pulse into fine crumbs, which makes pressing them into cupcake liners super simple. You can adjust the sweetness of the crust by opting for honey-flavored graham crackers, or even chocolate ones for a twist! They also absorb the melted butter to form a firm crust that doesn’t crumble when you take a bite.
Butter: Melted butter holds the graham cracker crumbs together, binding them into a solid base for the cheesecake filling. It adds a subtle richness that complements the sweetness of the graham crackers, giving the crust a toasty, golden finish after baking. If you want a slightly richer crust, feel free to use salted butter for a subtle contrast to the sweetness of the filling.
Granulated Sugar: Just a little sugar in the crust enhances the sweetness and flavor of the graham crackers. It melts as the crust bakes, helping it to set firm and giving it a slightly caramelized taste. In the filling, granulated sugar dissolves easily, adding a smooth, sweet flavor without overpowering the delicate white chocolate.
Cream Cheese: Cream cheese is the star ingredient in the filling, bringing that classic tangy, creamy texture we all love in a cheesecake. Make sure it’s softened to room temperature to avoid lumps and to make mixing easier. Its mild flavor pairs beautifully with the sweetness of white chocolate and vanilla, creating a balanced, melt-in-your-mouth filling.
White Chocolate Chips: These add a luxurious, sweet twist to the cheesecake filling, balancing the tanginess of the cream cheese with a creamy, chocolatey richness. Melted and slightly cooled, the white chocolate chips incorporate smoothly, enhancing the texture and giving a slight hint of vanilla and caramel notes. Make sure they’re fully melted but not hot, or they may clump when added to the cream cheese.
Sour Cream: Sour cream gives the filling its signature tang and creaminess, keeping the texture smooth and preventing the cheesecake from becoming too dense. It also helps the filling stay soft and velvety, and adds a gentle, refreshing tartness that balances the sweetness of the white chocolate. This is key to creating a perfectly creamy and slightly airy cheesecake texture.
Vanilla Extract: Vanilla extract enhances the flavor of both the filling and the white chocolate, bringing warmth and depth to the cheesecake. A high-quality vanilla extract will give the filling a subtle floral note that pairs beautifully with the creamy filling and fresh strawberries on top. It’s an essential ingredient for that classic cheesecake flavor we all crave.
Eggs: Eggs are the binding agent in the filling, giving the cheesecake structure while still keeping it creamy. Adding them one at a time helps prevent overmixing, which can cause the filling to crack during baking. Eggs also add a rich, smooth texture to the filling, allowing it to set up with a perfect balance of firmness and creaminess.
Heavy Whipping Cream: Whipping cream makes the whipped topping light and airy, perfect for balancing the richness of the cheesecake. When whipped to soft peaks, it has a pillowy texture that makes each bite feel luscious and indulgent. It’s unsweetened, which prevents it from overwhelming the other flavors, and adds that classic creamy finish to every mini cheesecake.
Powdered Sugar: A bit of powdered sugar adds a touch of sweetness to the whipped topping, helping it hold its shape and stay fluffy. Its fine texture dissolves easily into the cream, creating a smooth, velvety topping that’s perfect for piping. It’s just sweet enough to complement the strawberries without overpowering the cheesecake.
Fresh Strawberries: The strawberries add a pop of color, freshness, and a slight tartness that cuts through the richness of the cheesecake. Each berry sits beautifully on top of the whipped cream, adding a touch of natural sweetness and a hint of summer. They’re the perfect finishing touch, making each mini cheesecake look as delightful as it tastes.

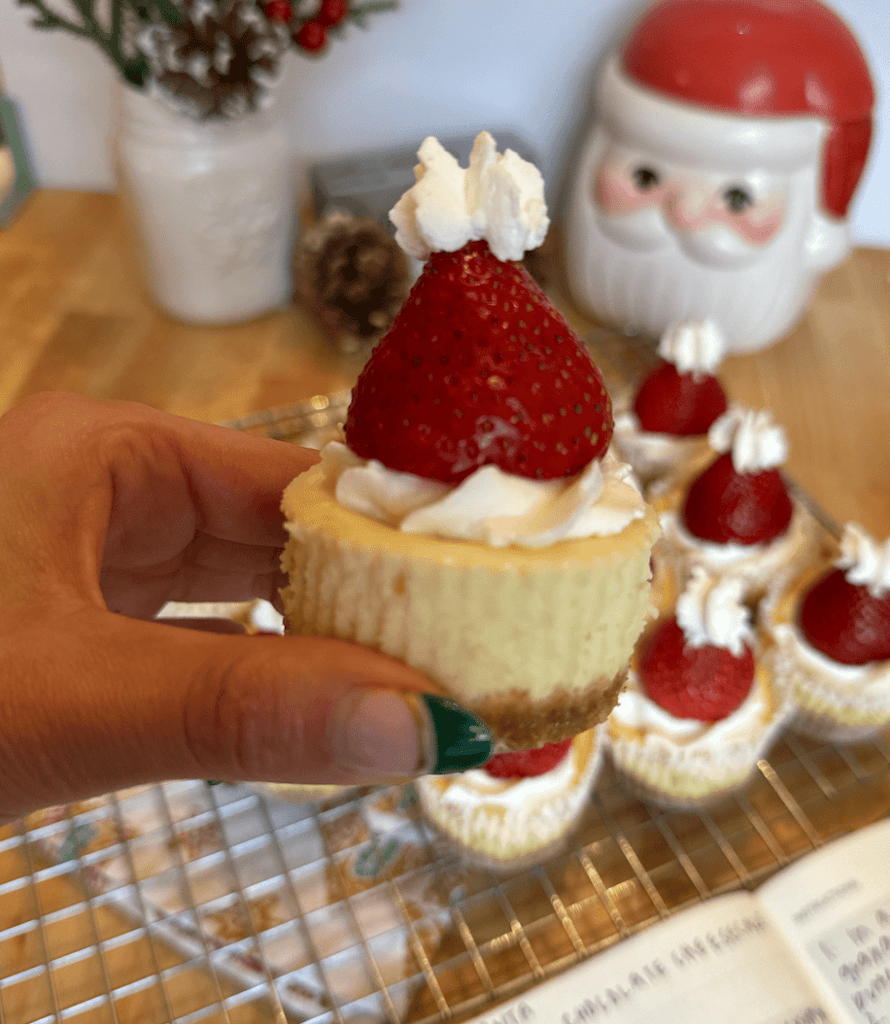
Mini Santa Hat Strawberry Cheesecakes – Festive Christmas Treats with White Chocolate & Graham Cracker Crust!
Ingredients
Graham Cracker Crust
- 8 full sheets graham crackers
- 3 tablespoons melted butter
- 1 tablespoon granulated sugar
Cheesecake Filling
- 12 ounces cream cheese, stened to room temperature
- ⅓ cup granulated sugar
- ½ cup white chocolate chips, melted and cooled
- ¼ cup sour cream
- 1 tablespoon pure vanilla extract
- 2 large eggs
Whipped Topping
- ½ cup heavy whipping cream
- 2 tablespoons powdered sugar
Topping
- 1 pint fresh strawberries, washed and hulled
Instructions
- Preheat your oven to 325°F (163°C). Line a 12-cup muffin tin with cupcake liners for easy removal and presentation.
- Place the graham crackers in a food processor and pulse until they’re broken down into fine crumbs. If you don’t have a food processor, place the graham crackers in a zip-top bag and crush them with a rolling pin.
- Transfer the graham cracker crumbs to a bowl and stir in the melted butter and granulated sugar. Mix until all the crumbs are coated and the mixture resembles wet sand.
- Scoop about 1 tablespoon of the crust mixture into each cupcake liner, pressing down firmly with the back of a spoon to create an even layer.
- Bake the crusts for 5 minutes, allowing them to set. Remove from the oven and let them cool slightly while you prepare the filling.
- Step 2: Make the Cheesecake Filling
- In the bowl of a stand mixer fitted with the paddle attachment, beat the cream cheese on medium speed until smooth and creamy, about 2 minutes.
- Add the granulated sugar and continue to beat until fully combined and smooth, scraping down the sides of the bowl as needed.
- Gradually add the melted and cooled white chocolate chips, mixing on low speed until incorporated. Be sure the chocolate has cooled to prevent it from clumping when mixed with the cold ingredients.
- Add the sour cream and vanilla extract, and continue to mix until the filling is smooth and evenly combined.
- Crack in the eggs one at a time, mixing on low speed just until each egg is incorporated. Be careful not to overmix, as this can cause air bubbles that may lead to cracking.
- Step 3: Assemble and Bake
- Divide the cheesecake filling evenly among the muffin cups, spooning it over the graham cracker crusts until each is about three-quarters full.
- Bake the cheesecakes at 325°F (163°C) for 15-18 minutes. You’ll know they’re ready when the centers are just slightly jiggly; they’ll firm up as they cool.
- Remove the cheesecakes from the oven and let them cool in the muffin tin for 20 minutes before transferring them to the refrigerator. Chill for at least 2-3 hours to allow the flavors to meld and the texture to set.
- Step 4: Prepare the Whipped Topping
- In a chilled mixing bowl, pour in the heavy whipping cream. Using a hand mixer or stand mixer with the whisk attachment, beat the cream on medium-high speed.
- As the cream thickens, add the powdered sugar and continue to whip until soft peaks form. Soft peaks should hold their shape but fall slightly when the whisk is lifted.
- Transfer the whipped cream to a piping bag fitted with a star tip or any tip you like for easy, decorative swirls.
- Step 5: Garnish and Serve
- Once the cheesecakes are fully chilled, pipe a swirl of whipped cream on each mini cheesecake.
- Top each with a fresh strawberry for a burst of color and sweetness. For an extra touch, you can add a light dusting of graham cracker crumbs over the whipped cream.
- Serve chilled and enjoy these creamy, delightful mini santa hat strawberry cheesecakes!
- These mini santa hat strawberry cheesecakes are perfect for any occasion, offering a creamy filling, crunchy crust, and refreshing berry on top. You can store leftovers (if there are any!) in an airtight container in the refrigerator for up to 3 days.
Video
Nutrition
Santa Hat Strawberry Cheesecake Tips & Tricks:
- Room Temperature Ingredients: Make sure the cream cheese and eggs are at room temperature. This prevents lumps in the filling and helps it blend smoothly.
- No Overmixing: Avoid overmixing the eggs in the filling, as this can lead to air bubbles and cracks on the surface. Mix just until incorporated for the creamiest texture.
- Let Them Cool Completely: Allow the mini cheesecakes to cool before transferring to the fridge. This helps them set up properly and gives them the best texture for slicing.
- Use a Piping Bag: To make the whipped topping look professional, use a piping bag with a star tip. This adds a decorative touch and makes each mini cheesecake look bakery-quality.


Leave a Reply Cancel reply