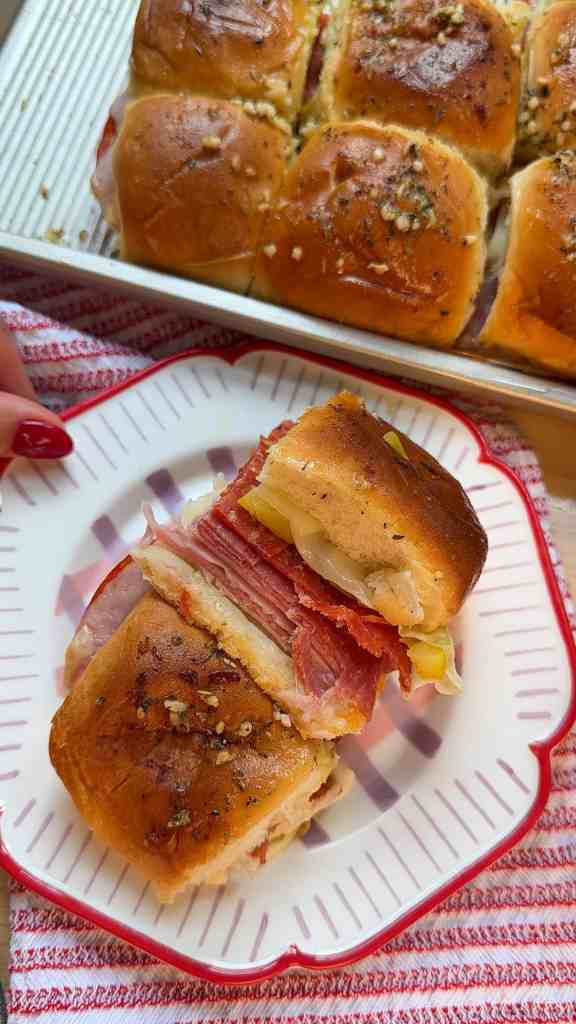
There’s something magical about a baked slider. They’re warm, melty, buttery little sandwiches that come together in minutes and disappear even faster. These Hot Italian Sub Sliders are inspired by the classic Italian deli sandwich—stacked with savory ham, spicy salami, bold pepperoni, tangy pepperoncini, and gooey provolone cheese. Tucked inside soft Hawaiian rolls and brushed with a garlic-Parmesan glaze, these are baked to golden perfection. Perfect for game days, family dinners, or feeding a hungry crowd without breaking a sweat.
Ingredients:
-
Hawaiian rolls: The slightly sweet, fluffy rolls perfectly contrast the salty meats and melted cheese. Plus, they bake up beautifully golden on top.
-
Provolone cheese: Melts like a dream and adds that classic Italian deli flavor. It’s creamy, subtle, and perfect for layering.
-
Deli ham: Adds a juicy, savory base to the slider stack. Choose a good-quality sliced ham for the best flavor.
-
Genoa salami: Brings bold, peppery notes and richness. A must for that authentic Italian sub flavor.
-
Pepperoni: Adds a little heat and fattiness, making the sliders extra crave-worthy.
-
Pepperoncini: These tangy, briny pickled peppers cut through the richness and add bright contrast. They’re the zingy surprise that ties everything together.
-
Unsalted butter: Melted butter makes the rolls golden and rich. We use it as the base of our flavorful topping.
-
Parmesan cheese: Salty and nutty, it adds savory depth to the buttery glaze.
-
Italian Seasoning: Adds a depth of flavor to the butter & the rolls.
-
Minced garlic: Adds that garlicky, cozy flavor we all know and love.
Why You’ll Love This Recipe:
-
Bold Italian deli flavor: Layers of meats, melted cheese, and zippy pepperoncini in every bite.
-
Simple & fast: 10 minutes of prep, 20 minutes in the oven, and done!
-
Crowd-friendly: Perfect for parties, potlucks, or easy weeknight dinners.
-
Totally customizable: You can tweak the meats, cheese, or toppings to suit your vibe.
Equipment Needed:
-
9×13-inch baking dish: Perfect size to hold the full slab of sliders and helps them bake evenly.
-
Serrated knife: Crucial for slicing the rolls cleanly without tearing or crushing them.
-
Small bowl & pastry brush: Used to mix and apply the garlic-Parmesan glaze evenly over the rolls.
Substitutions & Modifications:
-
Cheese swaps: Try mozzarella, fontina, or even smoked gouda for a twist.
-
Add-ins: Roasted red peppers or sun-dried tomatoes for more flavor.
-
Mild version: Leave out the pepperoncini and red pepper flakes for a kid-friendly version.
-
Gluten-free: Use gluten-free rolls and check that your deli meats are certified GF.

Hot Italian Sub Sliders (Cheesy, Baked & Party-Perfect)
Ingredients
For the sliders
- 1 package Hawaiian rolls 12-count
- 6 slices provolone cheese
- 8 slices deli ham
- 8 slices Genoa salami
- 6 slices pepperoni
- ⅓ cup sliced pepperoncini
Garlic butter topping
- 2 tbsp unsalted butter, melted
- 1 tablespoon grated Parmesan cheese
- 1 tablespoon italian seasoning
- 1 teaspoon minced garlic
- ¼ teaspoon red pepper flakes optional
Instructions
- Preheat the oven to 350°F (175°C). Lightly grease or line a 9×13-inch baking dish with parchment paper for easy cleanup.
- Slice the rolls: Keeping the rolls attached, slice the entire slab in half horizontally. Place the bottom half in the prepared baking dish.
- Layer the fillings: Add half the provolone cheese. Top with an even layer of ham, followed by the salami, then the pepperoni. Sprinkle the sliced pepperoncini evenly over the top. Add the remaining provolone slices. Place the top half of the rolls back on.
- Add half the provolone cheese.
- Top with an even layer of ham, followed by the salami, then the pepperoni.
- Sprinkle the sliced pepperoncini evenly over the top.
- Add the remaining provolone slices.
- Place the top half of the rolls back on.
- Make the garlic butter topping:In a small bowl, combine melted butter, Parmesan, italian seasoning, garlic, and red pepper flakes (if using). Stir until combined.
- Brush the rolls:Use a pastry brush or spoon to coat the tops of the rolls with the garlic-Parmesan butter mixture, letting it drip into the sides.
- Bake:Cover the dish with foil and bake for 15 minutes. Remove the foil and bake uncovered for an additional 5–8 minutes, or until the tops are golden and the cheese is melted.
- Serve:Let cool for a few minutes, then slice and serve warm!
Video
Nutrition
Tips & Tricks:
-
Use thin, even slices of meat for the best stacking and melty texture.
-
Want to level up? Add a swipe of pesto or a sprinkle of Italian seasoning before layering the meat.
-
Toast the bottom halves for 3–4 minutes before layering to prevent sogginess if you’re meal-prepping ahead.
-
Don’t skip the foil covering—it ensures the cheese melts without over-browning the rolls.
Storage Instructions
-
Store: Let sliders cool completely, then transfer to an airtight container in the fridge. They’ll keep for 3 days.
-
Reheat: Wrap individual sliders in foil and warm in the oven at 300°F for 10–12 minutes. You can also microwave for about 30 seconds.
-
Freeze: Assemble sliders (skip baking), wrap tightly in foil or plastic wrap, and freeze for up to 1 month. Bake from frozen, covered, for 25–30 minutes at 350°F, then uncover and finish baking until tops are golden.
More of my recipes
Do you LOVE Sliders?! Check out MORE of my Slider Recipes:5-Ingredient Buffalo Chicken Sliders – Easy, Cheesy, and Crowd-Pleasing Easy Meatball Sliders Hawaiian Rolls Recipe The Best Ever Pepperoni Pizza Pull Apart Hawaiian Rolls RecipeConclusion
These Hot Italian Sub Sliders are everything you love about an Italian sub—salty, cheesy, zippy, and buttery—but baked into one cozy, pull-apart tray of goodness. They’re easy to make, even easier to devour, and guaranteed to disappear at any party, potluck, or Sunday dinner.
Loved this recipe? Make sure to pin it, share it, and tag me on Instagram @munchiesbymallory when you bake them! I love seeing your creations in the wild. And don’t miss my other party-ready bakes like Buffalo Chicken Sliders or S’mores Ice Cream Cake for your next gathering. 🧡


Leave a Reply Cancel reply