


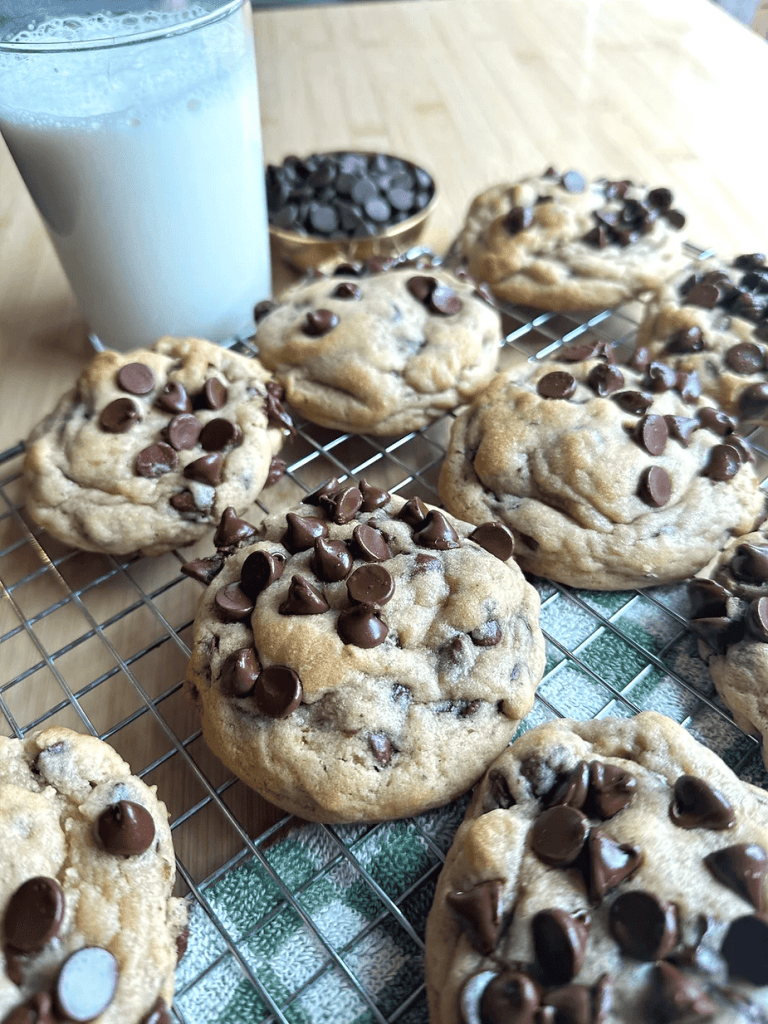
There’s something irresistible about a bakery-style cookie. You know the ones, oversized, golden brown with those perfectly crinkled edges, gooey centers, and just the right amount of melty chocolate peeking through the top. They look straight out of a coffee shop display case, thick, soft, and practically begging to be paired with your afternoon latte.
The best part? You don’t need a fancy bakery or commercial oven to make them at home. With a few simple techniques (and a little cookie science), you can bake bakery-style cookies that look and taste like they came from your favorite local coffee spot.
Whether you’re making them for your next at-home bakery day, a bake sale, or just to elevate your cookie game, this guide will walk you through everything, from mastering the dough to nailing that picture-perfect finish.
Let’s get baking.
What Makes a Cookie “bakery-Style”?
Before we dive into the how-to, let’s talk about what sets these cookies apart.
bakery-style cookies are:
-
- Thick and chewy with a slightly crisp edge.
-
- Large in size, usually about 3 to 4 inches wide.
-
- Rich in flavor (hello, brown butter and vanilla!).
-
- Beautifully rustic, often with visible chocolate pools, flaky sea salt, and an artisan-style shape.
They’re designed to look handmade, slightly imperfect, but in that irresistible, bakery-chic way. The goal isn’t perfection. It’s to create cookies that look indulgent, natural, and utterly photogenic.
Step 1: Start with the Right Ingredients
You can’t make a show-stopping cookie without great ingredients. bakery-style cookies rely on flavor depth, texture, and aroma, all of which come from using quality basics.
The Building Blocks:
-
- Butter (Browned or Room Temperature)
-
- Brown butter is the secret to bakery-style richness. It adds a nutty, caramelized depth that transforms simple chocolate chip cookies into something unforgettable.
-
- Try this in my Brown Butter Chocolate Chip Cookies.
-
- Butter (Browned or Room Temperature)

-
- Sugar
-
- Use a mix of brown and white sugar.
Brown sugar adds moisture and chew; white sugar helps with crispness. For bakery-style, go for more brown sugar, it gives that chewy, gooey center.
- Use a mix of brown and white sugar.
-
- Sugar
-
- Eggs
-
- Use room temperature eggs for a smoother dough and better structure. They help bind everything and create that luscious texture.
-
- Eggs
-
- Vanilla Extract
-
- Real vanilla makes a big difference. Try making your own Homemade Vanilla Extract for a more robust, aromatic flavor.
-
- Vanilla Extract
-
- Flour
-
- Use all-purpose flour for most recipes.
For extra texture, you can swap 1–2 tablespoons for bread flour (for chew) or pastry flour (for softness).
- Use all-purpose flour for most recipes.
-
- Flour
-
- Leavening
-
- Baking soda gives lift and helps with browning. Make sure it’s fresh!
-
- Leavening
-
- Chocolate
-
- Skip the chips and go for chopped high-quality bars, they create beautiful melted puddles. Brands like Ghirardelli, Lindt, or Valrhona are excellent choices.
-
- Chocolate
-
- Flaky Sea Salt
- Flaky Sea Salt
-
- The finishing touch that instantly makes cookies feel “bakery-worthy.” Sprinkle on top right before baking.
Step 2: Mastering the Dough
Now that your ingredients are ready, it’s all about technique.
1. Brown the Butter (Optional but Recommended)
To brown butter:
-
- Melt it in a saucepan over medium heat.
-
- Swirl occasionally until it foams and small brown specks appear.
-
- Remove from heat once it smells nutty (about 5–7 minutes).
Let it cool slightly before adding sugar.
- Remove from heat once it smells nutty (about 5–7 minutes).
Brown butter adds incredible flavor and those signature golden tones that make cookies shine in photos.

✨ Try it in recipes like my Brown Butter Banana Bread Minis for extra coziness.
2. Cream Butter and Sugar Properly
If you’re not browning butter, cream your softened butter with sugars until pale and fluffy, about 2–3 minutes with a hand or stand mixer.
This step creates air pockets that help your cookies rise and stay soft inside.
3. Chill Your Dough
Chilling is non-negotiable for bakery-style cookies. It:
-
- Helps the flour hydrate.
-
- Controls spreading.
-
- Intensifies flavor.
Refrigerate your dough for at least 2 hours, ideally overnight.
This is what gives cookies that thick, chewy texture you see behind bakery glass cases.
Step 3: Shaping the Cookies (Size Matters!)
bakery-style cookies are all about presentation, and that means making them bigger and chunkier than usual.
Pro Tips for Shaping:
-
- Use a large cookie scoop or measure about ¼ cup of dough per cookie.
-
- Roll the dough loosely so it looks slightly craggy, this helps form those rustic bakery cracks.
-
- Press a few extra chocolate chunks on top before baking for that “melty chip on display” look.
-
- Sprinkle with flaky sea salt right out of the oven.
-
- Reshape the cookies to make a perfect circle with a bowl or a circle cookie cutter. Gently circle the bowl around the cookie when they are fresh out of the oven to get uniform circular cookies every time.
Step 4: Bake Like a Pro
Here’s where precision matters.
Baking Tips for bakery-Style Cookies:
-
- Temperature: Bake at 350°F (175°C) for 10–13 minutes.
The edges should be golden, the centers slightly underbaked, they’ll set as they cool.
- Temperature: Bake at 350°F (175°C) for 10–13 minutes.
-
- Pan: Use light-colored baking sheets lined with parchment paper (dark pans can brown cookies too fast).
-
- Batch size: Bake fewer cookies per sheet, 5 to 6 max, to allow even airflow.
-
- Shape fix: right after baking, gently “scoot” the edges using a round cookie cutter for that perfect bakery-circle shape.
Let them cool on the tray for 5 minutes before transferring to a rack. The residual heat finishes baking them to perfection.
Step 5: The Finishing Touches
What makes bakery-style cookies Instagram-worthy are those final details that show care and craftsmanship.
Finishing Ideas:
-
- Flaky Salt: Maldon or fleur de sel adds texture and contrast.
-
- Drizzles: Melted chocolate or caramel drizzle = instant bakery chic.
-
- Presentation: Stack in a glass cookie jar, place in a parchment-lined tin, or wrap in bakery paper tied with string.

-
- Pairings: Serve alongside a frothy Banana Bread Latte or Sugar Cookie Almond Milk Latte.
Step 6: Experiment with Flavor Combinations
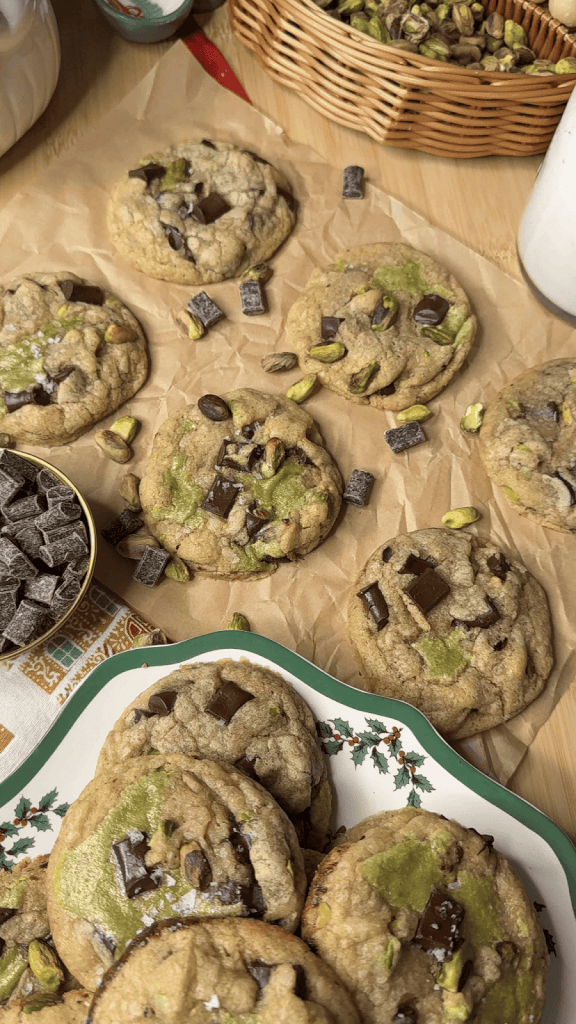
Once you master the base, get creative! bakery-style cookies are perfect for seasonal flavors and texture play.
Here are a few must-try favorites:


Step 7: Capture the Perfect Cookie Photo
If you want your cookies to look as good online as they do in real life, here’s how to get that drool-worthy shot.
Food Photography Tips:
-
- Natural Light: Shoot near a window with diffused daylight.
-
- Warm Tones: bakery-style cookies photograph beautifully in cozy, golden light.
-
- Texture Focus: Break one cookie open to show the gooey center.
-
- Props: Use a cup of coffee, linen napkin, or a baking tray for context.
-
- Top Trick: Sprinkle a few chocolate flakes or crumbs around for that effortless “fresh out of the oven” look.
Step 8: Storage & Make-Ahead Tips
Keep your cookies soft, chewy, and fresh with these tips:
-
- Storage:
Store in an airtight container at room temp for up to 4 days.
Add a slice of bread to the container to maintain softness.
- Storage:
-
- Freezing Dough:
Scoop cookie dough balls onto a tray, freeze, then transfer to a bag.
Bake from frozen, just add 1–2 minutes to the bake time.
- Freezing Dough:
-
- Freezing Baked Cookies:
Once cooled, wrap individually and freeze for up to 2 months.
Reheat in a 300°F oven for 5 minutes to refresh.
- Freezing Baked Cookies:
Step 9: Make Them Your Signature Cookie
Every bakery has a “house favorite”, so why not make your own?
Once you’ve nailed your technique, put your spin on it:
-
- Add mix-ins like pretzels, toasted coconut, or seasonal candy.
-
- Play with toppings (crushed candy canes, espresso glaze, sea salt flakes).
-
- Package them with your own labels or wrap for gifting.
These small touches make your cookies stand out, whether you’re sharing them with friends, selling at a market, or adding them to your at-home bakery spread.
Making picture-perfect bakery-style cookies isn’t about perfection, it’s about presence.
It’s about slowing down, paying attention to the details, and finding joy in the process: browning butter, scooping dough, sprinkling salt, and smelling that warm, sweet aroma fill your kitchen.
Once you learn these techniques, every batch becomes second nature, thick, chewy, golden, and proudly homemade.
So grab your apron, cue your favorite playlist, and bake your way to the kind of cookies you’d happily pay $5 for at a bakery. Because with the right ingredients, a little patience, and a touch of flair, you can make every cookie look (and taste) like a masterpiece.
Ready to Bake? Try These Bakery-Worthy Recipes Next:
💡 Takeaway:
bakery-style cookies are all about elevating the ordinary. With the right techniques and a touch of creativity, you can bring the cozy charm of a coffee shop straight to your kitchen, one golden, gooey cookie at a time.




Leave a Reply